Two ways to run FastDDNS on pfSense
Your hostname panel offers two setups. Method 2 adds FastDDNS to the built-in Services > Dynamic DNS client as a Custom provider — this is the one to keep, because pfSense stores it in the configuration and backs it up. Method 1 pastes a one-line script into the shell that installs a cron job running every two minutes. It works instantly, but pfSense does not manage that job.
The numbering below follows the labels in your panel, not the order we recommend. Set up Method 2 for the long term; reach for Method 1 when you want an update sent right now without clicking through a form.
| Method 2 — built-in DDNS client | Method 1 — crontab script | |
|---|---|---|
| Where you work | Services > Dynamic DNS in the web UI | Diagnostics > Command Prompt, or SSH |
| Kept in the pfSense config | Yes | No — see the limit below |
| Survives a config restore or reinstall | Yes | No |
| When it sends an update | When the monitored interface address changes, plus a daily re-check | Every 2 minutes, regardless |
| Setup effort | Seven fields, four of them copied from the panel | One paste |
| Good for | The permanent setup | An immediate first update, or a quick test |
Before you start
Four things, and two of them decide whether remote access will work at all.
- A FastDDNS hostname. Create one free at FastDDNS, then open it and scroll to DDNS Configuration Parameters > Firewall pfSense.
- Admin access to the pfSense web interface, and shell access only if you plan to use Method 1.
- A real public IP on the WAN interface. If your ISP puts you behind Carrier-Grade NAT, dynamic DNS cannot help — the hostname would point at an address nobody outside the ISP can reach. Check the WAN address on the pfSense dashboard, or run the CGNAT Checker in the FastDDNS mobile app.
- Firewall and NAT rules for whatever you want to reach. DDNS only keeps the name pointing at the right address; the way in is still your job. Confirm it afterwards with Port Check.
On the pfSense dashboard, an address in 10.0.0.0/8, 172.16.0.0/12, 192.168.0.0/16 or 100.64.0.0/10 on the WAN interface means something upstream is doing the NAT. The 100.64.0.0/10 range is the one reserved for Carrier-Grade NAT.
Method 2 — add FastDDNS as a Custom Dynamic DNS client
This is the setup worth keeping. pfSense stores it in config.xml, so it comes back with a configuration restore and survives a reinstall.
Step 1 — copy the update URL from your hostname panel
Open your hostname, scroll to DDNS Configuration Parameters and expand Firewall pfSense. Everything you need for both methods is in that one panel:
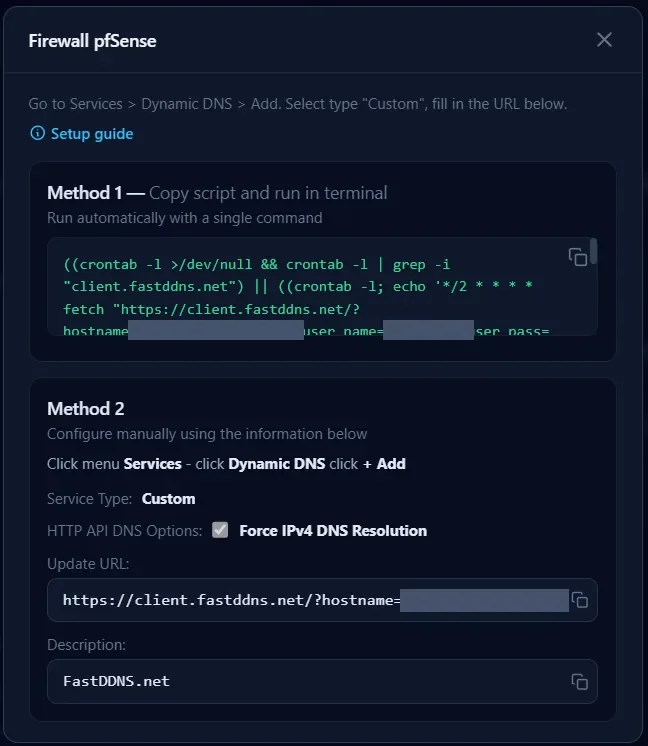
Copy the Update URL box under Method 2. It already contains your hostname and credentials:
https://client.fastddns.net/?hostname=myhome.fastddns.net&user_name=YOUR-USERNAME&user_pass=YOUR-UPDATE-PASSWORDThe three values in capitals stand in for what is private to your account — the panel fills them in for you.
Step 2 — open the Dynamic DNS client
In the pfSense web interface go to Services > Dynamic DNS and click + Add.
Step 3 — fill in the fields
| Field | Value | Why |
|---|---|---|
| Service Type | Custom | FastDDNS is not in the built-in provider list, and does not need to be |
| Interface to Monitor | WAN | The interface whose address change should trigger an update |
| Hostname | your FastDDNS hostname | The update URL already carries it, so for the Custom type this is mainly the label you will see in the list |
| Update URL | the URL from Step 1 | Paste it whole. There is no %IP% to substitute — FastDDNS records the address the request arrives from |
| Force IPv4 DNS Resolution | checked | Resolves the update host over IPv4 only, so the address FastDDNS records is your IPv4 WAN address rather than an IPv6 one |
| Result Match | leave empty | pfSense compares this to the whole reply. FastDDNS answers good after a change and nochg when nothing moved, so no single fixed string matches both — the panel's own instructions do not set one |
| Description | FastDDNS.net | Free text, for your own reference |
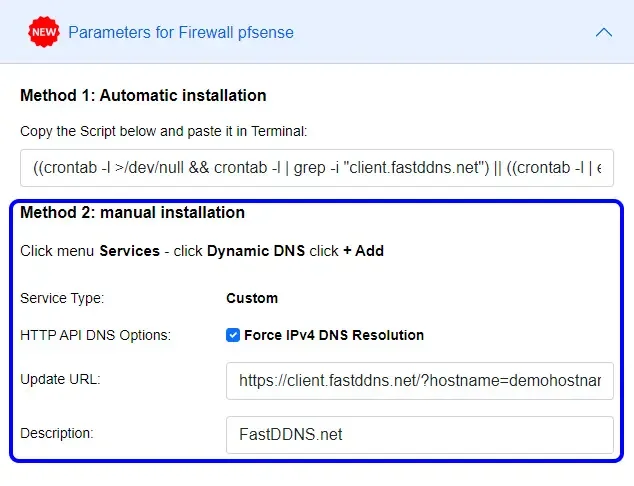
Step 4 — save, then read the status column
Click Save & Force Update. Back on the Services > Dynamic DNS list, the Cached IP column should fill in with your current WAN address. An empty entry, or one that stays stale after a forced update, means the update did not go through — the troubleshooting table below covers why.
One thing to understand about this method: it is driven by events, not by a two-minute heartbeat. Netgate documents the service as updating when an interface address changes, and pfSense also ships a default cron entry that runs /etc/rc.dyndns.update once a day at 01:01 as a safety net. So a failed update does get retried — just not within minutes. When you need one immediately, use Save & Force Update.
If you would rather drive the same endpoint from your own script, the parameters are documented on the FastDDNS client API page.
The walkthrough below is an older recording, so the panel looks different from the screenshots here. The fields and the order of the steps are the same.
Method 1 — the one-line crontab script
Step 1 — copy the script from your hostname panel
In the same Firewall pfSense panel, copy the box under Method 1. It is one line built around the same update URL:
((crontab -l >/dev/null && crontab -l | grep -i "client.fastddns.net") || ((crontab -l; echo '*/2 * * * * fetch "URL" -o /dev/null || curl -s "URL"') | crontab -; fetch "URL" -o /dev/null || curl -s "URL"; printf "\n\nAdded Dynamic DNS Script to crontab successfully\n\n"; exit 1;)) && printf "\n\nFastDDNS is available \n\n";In the real line, each URL above is your full update URL from Step 1 of Method 2. Copy it from the panel rather than assembling it by hand.
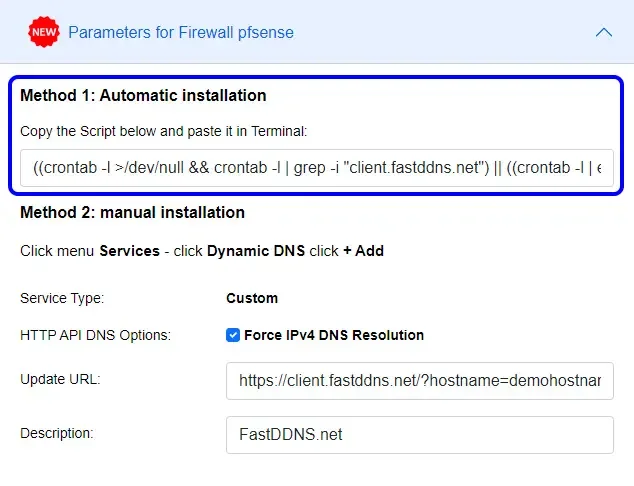
Step 2 — run it
Paste the line into Diagnostics > Command Prompt, in the Execute Shell Command box, and press Execute. An SSH session or option 8 on the console works just as well.
Netgate's own warning applies to this page in general: it runs whatever you paste with full privileges, and a bad command can leave the firewall unusable. Paste the line from your panel, nothing else. The command also has to finish and return — this one does, which is why it is safe to run here.
Step 3 — what the two messages mean
Look for one of these two lines at the end of the output. They mean different things:
| Message | What happened |
|---|---|
| Added Dynamic DNS Script to crontab successfully | There was no FastDDNS entry in the crontab, so one was added and an update was sent straight away |
| FastDDNS is available | An entry was already there, so nothing was changed |
The check is a plain grep for client.fastddns.net across the whole crontab. That keeps you from installing the job twice — but it also means that if you add a second hostname on the same firewall, the script will see the first one and decline to add anything. The second hostname needs its cron line added by hand.
That grep is also why the second run prints more than the one line: a match is printed, and the matching line is the cron entry, which contains your update URL in full — username and password included. If you are running this over someone's shoulder or pasting the output into a ticket, that is the line to cut out.
The scheduled line itself runs fetch, the FreeBSD downloader pfSense ships with, and falls back to curl if that fails.
Step 4 — the limit worth knowing before you rely on it
pfSense keeps its own scheduled tasks in config.xml and rebuilds the system crontab from there. A job added with crontab - lives in the root user's crontab instead, which pfSense does not manage and does not include in a configuration backup. Two consequences:
- Restore a configuration, or reinstall the firewall, and the job is not there — the Dynamic DNS client from Method 2 would be.
- If System > Advanced > Miscellaneous has RAM disks enabled for
/tmpand/var, the root crontab sits in RAM. Netgate documents that only RRD data, DHCP leases, logs and Captive Portal data are preserved across a reboot from those RAM disks — a crontab is not on that list.
None of that makes Method 1 wrong. It makes it a good way to get updating now, and a poor way to leave things for a year. If you want a cron job that pfSense really does keep, install the Cron package and add the same line through it.
Another older recording, showing the script route on the previous panel design.
Check that the hostname is really updating
Whichever method you used, prove it from three angles.
In pfSense, Services > Dynamic DNS shows a Cached IP for each entry — it should match your WAN address. If you used Method 1 instead, confirm the job exists and run it once by hand from the shell:
crontab -l
fetch -o - "PASTE-YOUR-UPDATE-URL-HERE"
That second command prints the server's reply. It should start with good if the address just changed, or nochg if it was already correct — FastDDNS may append the address it recorded. badauth is the one reply that pins the problem down: the username or update password is wrong. Any other reply, or no reply at all, is not self-explanatory — read what actually came back, then check the system log.
From outside, resolve the hostname and compare it with your public address:
nslookup myhome.fastddns.netFinally, your hostname panel shows a Last Updated timestamp that changes from Not yet updated the first time the firewall reports in. FastDDNS applies a new address in under 60 seconds, though a local DNS cache may hold the old one a little longer.
Troubleshooting pfSense DDNS
| What you see | Why | What to do |
|---|---|---|
The reply is badauth | Wrong username or update password in the URL | Copy the Update URL from the panel again; if you came from another provider, see the guide on replacing a No-IP or DynDNS server address |
| Cached IP stays empty after saving | The client could not reach the update host, or the URL was truncated on paste | Use Save & Force Update, then read Status > System Logs > System > General; switching on Verbose Logging in the entry shows the full exchange |
| The hostname resolves to an IPv6 address | The update host was reached over IPv6, so that is the address that got recorded | Tick Force IPv4 DNS Resolution on the Dynamic DNS entry and force an update |
| Every update is logged as failed although the hostname is correct | Result Match is set to a fixed string, and the reply alternates between good and nochg | Clear the Result Match field to switch result checking off |
| Method 1 worked, then stopped after a reboot or a config restore | The cron job is outside config.xml, and can sit on a RAM disk | Set up Method 2 instead, or add the line through the Cron package |
| Hostname resolves, but nothing answers on your port | DDNS is working; the path into the network is not | Add the NAT and firewall rules, then test from outside with Port Check |
| Hostname resolves to an address that is not your public IP | The firewall sits behind another NAT layer, often CGNAT | Compare the WAN address on the dashboard with what a public IP lookup reports; if they differ, ask your ISP for a public IP |
| Everything worked, then stopped after months | A free hostname is renewed once a year, and a temporary one lasts 30 days | Renew it from your account, or move to a plan whose hostnames do not expire |
Keep your update URL private
The update URL carries your hostname, username and update password as plain query parameters. It is stored that way in the pfSense configuration and, with Method 1, in the crontab — anyone who can read a configuration backup can read those credentials. Treat a pfSense config export the way you would treat a password file, and never paste an unredacted update URL into a forum thread or a support ticket. If you already have, change the update password in your account and reconfigure the entry.
Frequently Asked Questions
Should I use the Dynamic DNS client or the cron script?
Use the Dynamic DNS client under Services > Dynamic DNS for anything you intend to keep. pfSense stores it in the configuration, so it is part of a backup and comes back after a reinstall. The cron script is the faster way to get a first update out, but pfSense does not manage that job and it can be lost on a reboot or a config restore.
Do I need to open a port for the DDNS update itself?
No. pfSense opens an outbound HTTPS connection to FastDDNS, so no inbound rule is needed for the update. You still need port forwarding and firewall rules for the services you want to reach through the hostname, such as 554 for RTSP or a camera's web port.
Why does the panel ask me to force IPv4 resolution?
Because FastDDNS records the address your request arrives from. If pfSense resolves the update host to an IPv6 address and connects over IPv6, that is the address it records, and your A record ends up wrong or empty. Forcing IPv4 resolution keeps the update on the same protocol as the address you want published.
Will this work if my ISP uses CGNAT?
No. Behind Carrier-Grade NAT your firewall has no public IP of its own, so there is no address a hostname could usefully point to, and incoming connections are blocked by the ISP. Dynamic DNS solves changing addresses, not missing ones. Ask your ISP for a public IP address, or use a service that tunnels outbound.
Running something else at the edge? The same update URL works anywhere that can make a scheduled HTTPS request, including the MikroTik RouterOS setup.