
Two ways to set up DDNS on a MikroTik router
FastDDNS gives every hostname two ready-made RouterOS setups. Method 1 is a single line you paste into the terminal: it downloads a script built for your hostname, then creates a /system script and a /system scheduler entry for you. Method 2 is the same update command entered by hand under System > Scheduler. Both call the FastDDNS update URL every two minutes.
Use Method 1 unless you have a reason not to. Use Method 2 if you prefer WinBox over the terminal, if your router blocks the download, or if you want the scheduler under a name you chose.
| Method 1 — auto script | Method 2 — manual scheduler | |
|---|---|---|
| Where you work | Terminal (WinBox or SSH) | System > Scheduler in WinBox / WebFig |
| What you paste | One line | Three fields plus one command |
| Scheduler name it creates | FastDDNS.net (fixed) | Anything you type — the panel suggests fastddns |
| Update interval | 120 seconds | 00:02:00 |
| First update | Runs once immediately after install | Runs after the first interval |
| Time limit | The download link expires 1 hour after the panel generates it | None |
Before you start
Four things, and two of them decide whether remote access will work at all.
- A FastDDNS hostname. Create one free at FastDDNS, then open that hostname and scroll to DDNS Configuration Parameters > MikroTik Routers.
- Admin access to RouterOS through WinBox, WebFig, or SSH.
- A real public IP on the WAN interface. If your ISP puts you behind Carrier-Grade NAT, dynamic DNS cannot help — the hostname will point at an address that nobody outside the ISP can reach. Run the CGNAT Checker in the FastDDNS mobile app before you spend time on the router.
- Port forwarding for whatever you want to reach. DDNS only keeps the name pointing at the right address. You still need the matching firewall and NAT rules on the router, and you can confirm them afterwards with Port Check.
To see what your router actually holds, list the addresses and look at the row whose interface is your WAN link — the one carrying the default route:
/ip address print
/ip route print where dst-address=0.0.0.0/0
If that WAN address falls in 10.0.0.0/8, 172.16.0.0/12, 192.168.0.0/16 or 100.64.0.0/10, the router does not have a public IP and something upstream is doing the NAT. The 100.64.0.0/10 range in particular is the one reserved for Carrier-Grade NAT.
Method 1 — the one-line auto-install script
Step 1 — copy the line from your hostname panel
Open your hostname and scroll to the DDNS Configuration Parameters section at the bottom of the page. Every supported device family has a panel there; the one you want is MikroTik Routers.
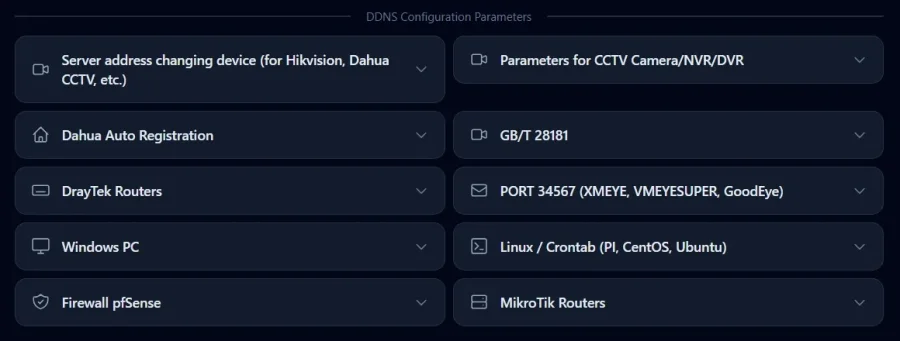
Open it and copy the box under Method 1. It is one long line ending in a token that belongs to your account:
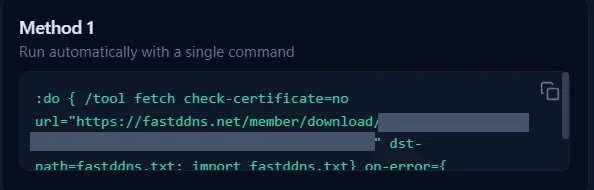
:do { /tool fetch check-certificate=no url="https://fastddns.net/member/download/YOUR-DOWNLOAD-TOKEN" dst-path=fastddns.txt; import fastddns.txt} on-error={ [:terminal style error]; :put "ERROR"; }Copy the real line from the panel rather than retyping this one — the token is what identifies your hostname.
Step 2 — paste it into the terminal
In WinBox open New Terminal, or connect over SSH, then paste the line and press Enter. /tool fetch downloads the personalised script into the router's Files list as fastddns.txt, and import executes it.
About check-certificate=no: it tells fetch to skip trust-chain validation of the TLS certificate. RouterOS already defaults to no for that setting, and the panel spells it out so the download still works on a router with an empty certificate store or a clock that has not synced yet. If you would rather have the certificate validated, switch it to check-certificate=yes — that only succeeds once the router has a CA store imported and its clock is correct. Note what that switch does and does not cover: it applies to this one-time download only. The script the router installs afterwards carries its own check-certificate=no for every recurring update, and so does the Method 2 command.
Step 3 — what the script creates
The imported file is not a black box. It prints your hostname, username and key, then does four things:
- removes any existing script and scheduler named FastDDNS.net, so re-running it never leaves duplicates behind;
- adds a /system script called FastDDNS.net containing the update command;
- adds a /system scheduler called FastDDNS.net with
interval=120sandstart-time=startup; - runs the script once straight away, instead of waiting for the first scheduled run.
A finished install looks like this in the terminal:
ADD new Script: Complete.
ADD new Scheduler: Complete.
Complete add FastDDNS.
Read those three lines for what they are: the script and the scheduler now exist. They do not prove the hostname was updated — the installer prints Complete add FastDDNS. even if that first run was rejected. Confirm the update itself with the checks further down.
Step 4 — the download link expires after one hour
The token in that line is generated when the panel page is rendered and stops working 3600 seconds later. Paste an older copy and the router prints ERROR, because the server answered 410 # Download token expired. instead of a script. The fix is simply to reload your hostname page and copy the line again.
The walkthrough below is an older recording. The panel has been redesigned since, so it will not match the screenshots above — the steps and the command itself have not changed.
Method 2 — set up the scheduler by hand
This produces the same result as Method 1, but you type it yourself and nothing is downloaded to the router.
Step 1 — create the scheduler entry
In WinBox go to System > Scheduler and add a new entry with these three values, which the panel shows next to the script with a copy button on each:
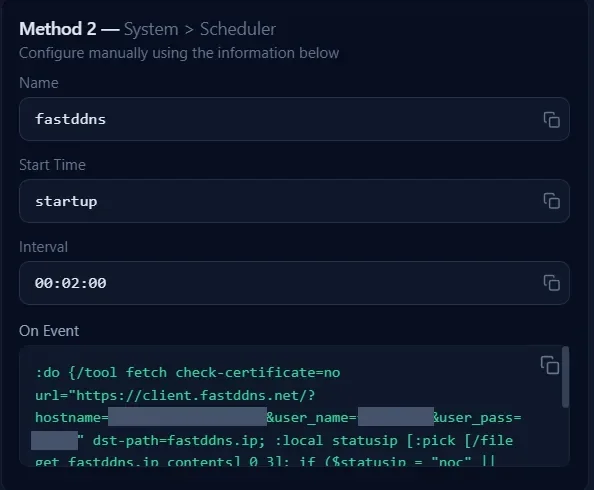
| Field | Value | What it does |
|---|---|---|
| Name | fastddns | Any name works; this one keeps it obvious in the list |
| Start Time | startup | Anchors the schedule to boot time instead of a clock time — see the note under this table |
| Interval | 00:02:00 | Repeats every two minutes |
One RouterOS detail worth knowing: start-time=startup behaves as if the start time were three seconds after the console comes up, but MikroTik documents that an entry with a non-zero interval does not run at startup. So the first execution happens one interval after boot, not at boot. After a reboot your hostname is refreshed about two minutes in, not instantly.
Step 2 — paste the update command into On Event
Copy the On Event box from the panel. The shape is:
:do {/tool fetch check-certificate=no url="https://client.fastddns.net/?hostname=myhome.fastddns.net&user_name=YOUR-USERNAME&user_pass=YOUR-UPDATE-PASSWORD" dst-path=fastddns.ip; :local statusip [:pick [/file get fastddns.ip contents] 0 3]; if ($statusip = "noc" || $statusip = "goo") do={[/terminal style ambiguous];:put "Updated IP address";}; } on-error={[:terminal style error];:put "Can not connect to server FastDDNS.net.";:error "exit";};Replace nothing by hand — the panel has already filled in your hostname, username and update password. The three placeholders above only stand in for values that are private to your account.
Step 3 — how the script knows the update worked
The fetch saves the server's answer to fastddns.ip, and :pick … 0 3 reads its first three characters. FastDDNS replies in the standard DynDNS vocabulary, so those three characters are enough to tell the outcomes apart:
| Reply | First 3 chars | Meaning |
|---|---|---|
good | goo | The hostname was updated to a new address |
nochg | noc | The address had not changed — nothing to do |
badauth | bad | Wrong username or update password |
The script only tests for goo and noc, and prints Updated IP address for either. Anything else — badauth included — falls through silently: the fetch succeeded, so on-error never fires and nothing is printed. Silence is not success. Read fastddns.ip when in doubt. The protocol itself is documented on the FastDDNS client API page if you would rather write your own script.
The manual route on video — again an older recording of the panel, with the same four values.
Check that the hostname is really updating
Three checks on the router, one off it. On the router:
/system scheduler print
/file print
:put [/file get fastddns.ip contents]
The scheduler listing has a run-count column that increases every two minutes. That tells you the entry is firing — it does not tell you the update succeeded, because a scheduler running a failing command still counts up. The proof is the file: fastddns.ip must exist, and its contents must start with good or nochg — the server may append the address it recorded.
Off the router, resolve the hostname from any machine and compare it with your current public address:
nslookup myhome.fastddns.netYour hostname panel also shows a Last Updated timestamp, which changes from Not yet updated the first time the router reports in. FastDDNS applies a new address in under 60 seconds, though your local DNS cache may hold the old one a little longer.
Troubleshooting MikroTik DDNS
| What you see | Why | What to do |
|---|---|---|
ERROR right after pasting the Method 1 line | The download token has expired, or the router could not reach the site | Reload the hostname page, copy the line again, and paste it within the hour |
| Can not connect to server FastDDNS.net. | The router cannot resolve or reach the update URL | Diagnose before changing anything: /ip dns print for a configured resolver, then :put [:resolve client.fastddns.net] to test name resolution from the router itself. Only add public resolvers if the list is empty — overwriting a working internal resolver breaks local name resolution |
fastddns.ip contains badauth | Wrong username or update password in the command | Copy the On Event box from the panel again; if you migrated from another provider, see the guide on replacing a No-IP or DynDNS server address |
| Hostname resolves, but nothing responds on your port | DDNS is working; the path into your network is not | Add the NAT and firewall rules, then test the port from outside with Port Check |
| Hostname resolves to an address that is not your public IP | The router sits behind another NAT layer, often CGNAT | Compare /ip address print with what a public IP lookup reports; if they differ, ask your ISP for a public IP |
| Everything worked, then stopped after months | A free hostname is renewed once a year and a temporary one lasts 30 days | Renew it from your account, or move to a plan whose hostnames do not expire |
Keep your update script private
Both methods store your hostname, username and update password in plain text on the router — in the scheduler's On Event field, or inside /system script. Anyone who can read the configuration can read those values, so treat a full RouterOS export the way you would treat a password file. If you have already pasted one into a forum post or a support ticket, change the update password in your account and reinstall the script.
The downloaded fastddns.txt is only needed during installation. You can delete it afterwards from Files without affecting the scheduler.
Frequently Asked Questions
Do I need to open a port for the DDNS update itself?
No. The router opens an outbound HTTPS connection to FastDDNS, so no inbound rule is needed for the update. You do need port forwarding for the services you want to reach through the hostname, such as 554 for RTSP or the web port of a camera.
How often does MikroTik send the update, and how fast does the hostname change?
The scheduler runs every two minutes in both methods. When the address has actually changed, FastDDNS applies it in under 60 seconds, so the worst case after an IP change is roughly two minutes of scheduler wait plus the propagation time.
Will this work if my ISP uses CGNAT?
No. Behind Carrier-Grade NAT your router has no public IP of its own, so there is no address a hostname could usefully point to and incoming connections are blocked by the ISP. Dynamic DNS solves changing addresses, not missing ones. Ask your ISP for a public IP address, or use a service that tunnels outbound.
Does the hostname expire?
A free permanent hostname is renewed once a year from your account, and temporary hostnames last 30 days. Hostnames on a paid plan do not expire; the details are on the pricing page.
Running a different router? The same update URL works anywhere that can make a scheduled HTTPS request, including the DrayTek setup covered here.