How to set up DrayTek DDNS with FastDDNS
Open Applications > Dynamic DNS on your DrayTek router, enable Dynamic DNS Setup, and open a free index slot. Set Service Provider to User-Defined, Provider Host to dyn.fastddns.net, paste the Service API string from your FastDDNS hostname page, then choose basic auth over HTTPS. As soon as the router sends its first update the hostname starts following your public IP, and FastDDNS applies each update within 60 seconds.
What you need before you start
- A DrayTek router whose firmware offers Applications > Dynamic DNS with a User-Defined provider option.
- A public IPv4 address reaching your line. Check the WAN IP on the router's status page: if it is private, either a second device of yours is in front of the router — fixable, see Step 4 and the troubleshooting section — or your ISP is using Carrier-Grade NAT, in which case inbound connections never arrive and no DDNS service changes that.
- A free FastDDNS account and one hostname. The free plan gives one permanent hostname renewed once a year, plus unlimited temporary hostnames that live 30 days each; paid plans raise the limit.
- Router admin access, and a browser on the same local network.
DDNS and port forwarding do two different jobs. The router sends its DDNS update outbound, so nothing has to be open for the hostname to start working. Forwarding ports is a separate step that lets traffic reach a device from the internet — covered at the end of this guide.
Step 1 — Copy your parameters from FastDDNS
Sign in, open the hostname you want the router to update, and scroll to DDNS Configuration Parameters. Expand the DrayTek Routers panel: it prints every value the router asks for, already filled in for that hostname.
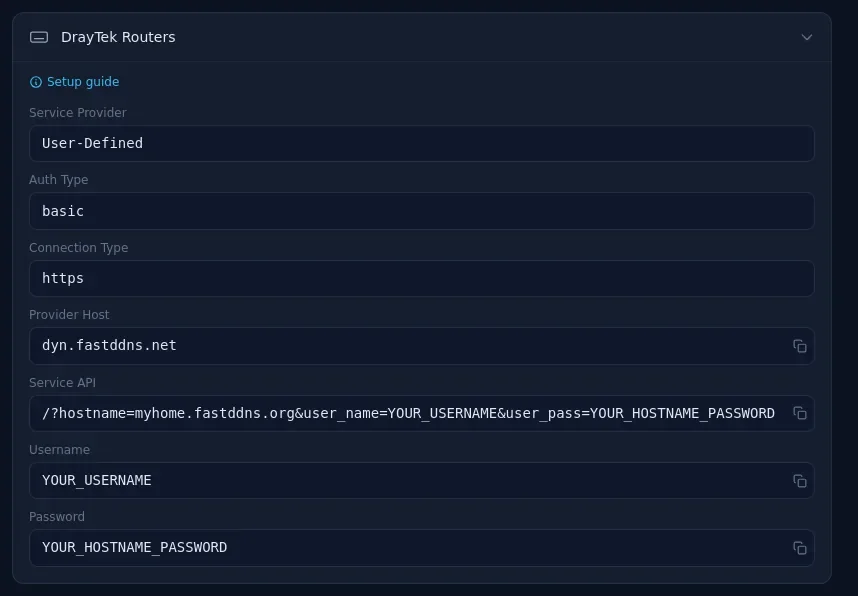
The panel gives you:
| Field on the router | Value |
|---|---|
| Service Provider | User-Defined |
| Auth Type | basic |
| Connection Type | https |
| Provider Host | dyn.fastddns.net |
| Service API | /?hostname=your hostname&user_name=your username&user_pass=your hostname password |
| Login Name | your FastDDNS account username |
| Password | the hostname password shown in that panel |
That last row is where most failed setups come from: the password the router wants is the key belonging to the hostname, not the password you use to sign in to FastDDNS. Copy it from the panel rather than typing it from memory.
If you are moving off another provider, the same values also work through the update API — see the FastDDNS client API reference if you would rather script it than use the router's built-in client.
Step 2 — Open the Dynamic DNS page on the router
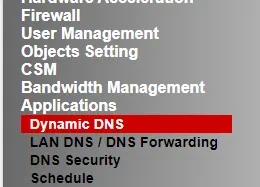
Sign in to the router's web interface and pick Applications in the left menu, then Dynamic DNS.
Step 3 — Enable Dynamic DNS and pick an index slot
On the Dynamic DNS Setup page, tick Enable Dynamic DNS Setup. The Accounts table below holds several numbered slots; click any free index number to open its account form. One slot holds one hostname.
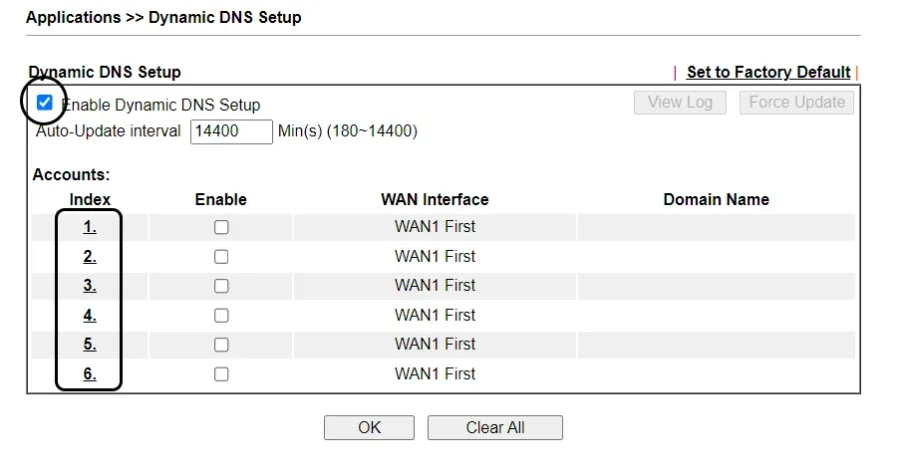
Check Auto-Update interval before you move on. On the firmware in the screenshot it accepts 180 to 14400 minutes and ships at 14400 — roughly ten days. If your public IP changes and you find the hostname still pointing at the old one hours later, this is the first place to look; lower it to something that matches how often your ISP actually moves you.
Step 4 — Fill in the Dynamic DNS Account form
Fill the form with the values from Step 1:
- Tick Enable Dynamic DNS Account.
- WAN Interface — pick the WAN interface that carries your internet connection.
- Service Provider — User-Defined.
- Provider Host — dyn.fastddns.net.
- Service API — paste the whole string, starting with the leading slash.
- Auth Type — basic.
- Connection Type — Https.
- Server Response — leave empty.
- Login Name — your FastDDNS username.
- Password — the hostname password.
- Determine WAN IP — WAN IP if the router holds the public address itself; see the note below if it does not.
Click OK to save.
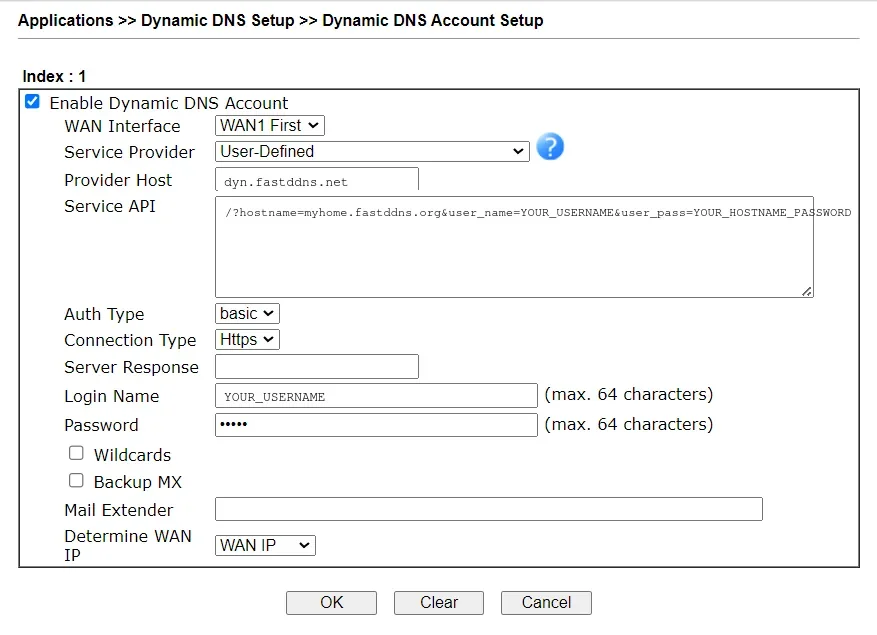
Two settings are worth a second look.
Determine WAN IP depends on where the public address actually sits. When the router terminates the internet connection itself, its WAN address is the public address and WAN IP is correct. When the router sits behind another router or an ISP modem in routing mode, its WAN address is a private one — publishing that is useless, so pick the option that asks an external service what your public IP is instead. In that setup you also have to forward the port on both devices for anything to reach through.
Connection Type should stay on Https. The Service API string carries your hostname password, so sending it over plain HTTP exposes it to anyone on the path.
Step 5 — Check that the hostname resolves
Do not wait for the interval to come round. The Dynamic DNS Setup page from Step 3 has a Force Update button — use it to push an update now, and View Log beside it to see what the router sent and what came back. Then confirm the update landed. The IP on the FastDDNS hostname page should now be your public address — the same one a "what is my IP" lookup returns from inside your network. On a router that holds the public address itself, that is also its WAN IP. Confirm from your own machine too:
nslookup myhome.fastddns.orgOn macOS or Linux:
dig +short myhome.fastddns.orgIf that returns your public IP, DDNS is done. Nothing on the router's firewall had to change to get this far.
Step 6 — Forward the ports you actually need
A resolving hostname points visitors at your router; it does not let them through it. To reach a device behind the router, add a port forwarding rule in the router's NAT section, pointing at the device's LAN address.
Give that device a static LAN IP or a DHCP reservation first, otherwise the rule will point at the wrong host after a reboot. Then test from a connection that is not your own — mobile data works well, because many routers cannot loop a connection back to themselves from inside. The Port Check tool tells you whether the port is actually reachable from outside.
Forward only what you need, and never expose a device that still uses a shipped or weak password.
Troubleshooting
The hostname never updates. Re-open the account form and compare it field by field with the panel from Step 1 — a trailing space in Provider Host or a missing leading slash in Service API is enough to break it silently. Check that the password is the hostname key and not your account password. Confirm the router's clock and time zone are correct, since an HTTPS handshake fails when the clock is far off.
The hostname resolves to an address you do not recognise. Compare the router's WAN IP with what FastDDNS shows. A private WAN address means something upstream is translating your traffic, and the fix depends on which of two cases you are in.
- A second router you control — typically an ISP modem left in routing mode, giving your DrayTek a 192.168.x.x, 10.x.x.x or 172.16–31.x.x WAN address. This is fixable: publish the externally detected IP rather than the WAN IP, forward the port on both devices, or put the upstream modem into bridge mode so the DrayTek holds the public address directly.
- Carrier-Grade NAT at the ISP — the giveaway is a WAN address in 100.64.0.0/10, or a private WAN address with no second device of yours in front of it. Here the public IP is shared with other customers and you cannot forward a port through it. No DDNS service changes that. The realistic options are to ask the ISP for a public IPv4 address, or to reach the device through a VPN or tunnel you host elsewhere.
The hostname resolves but you still cannot connect. That is a port forwarding problem, not a DDNS one. Re-check Step 6 and test from outside your own network.
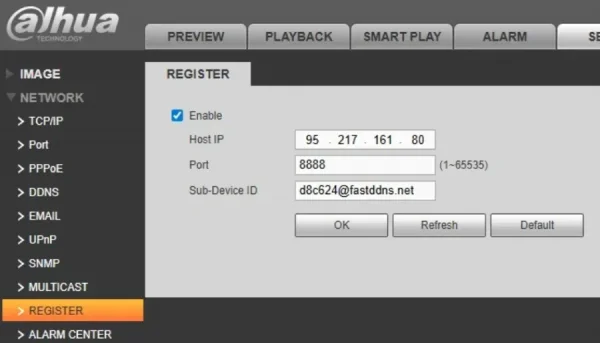
You are migrating from another provider. If the device itself — rather than the router — was doing the updating, see how to point a device at a different DDNS server address.
Which DrayTek routers this applies to
The router screenshots here come from a Vigor 2950. The same flow applies to any DrayTek model whose firmware exposes Applications > Dynamic DNS with a User-Defined provider, but menu wording and field order shift between firmware generations, and only the Vigor 2950 was checked for this guide. If your form looks different, match by field name rather than by position — the seven values in Step 1 are what matter.
The FastDDNS values in Step 1 were checked against the live hostname panel on 3 September 2026. That panel is always current for your account, so if it ever disagrees with this page, follow the panel.
Frequently asked questions
Which password does the DrayTek DDNS form want?
The password belonging to the hostname, shown in the DrayTek panel on that hostname's page. It is not the password you sign in to FastDDNS with. Each hostname has its own key, and you can regenerate it from the hostname page if it is ever exposed.
Do I need to open a port before DDNS will work?
No. The router sends its update outbound, so the hostname starts following your IP with no inbound rule at all. Port forwarding is only needed afterwards, so that traffic from the internet can reach a device behind the router.
Can one DrayTek router update several hostnames?
Yes — each index slot on the Dynamic DNS Setup page holds one hostname. But if every device sits behind the same public IP, one hostname already covers them all and you tell the devices apart by port. Extra hostnames for the same IP only consume your quota.
Do not have a hostname yet? Create one free on FastDDNS and come back to Step 1.