TL;DR
- Automatically configure DDNS for cameras and recorders
- No need to log into each device for manual setup
- Supports multiple popular camera brands
- Port forwarding is still required for external access
Want to simplify the setup? Download the FastDDNS app and automatically configure DDNS: Get FastDDNS
What Is Automatic DDNS Configuration
Understand the core concept to avoid configuration errors.
The automatic DDNS configuration feature on FastDDNS allows the system to automatically fill in and configure required parameters such as hostname, IP (LAN or WAN), port, and device login credentials.
Instead of manually accessing each camera or recorder, you can complete the entire setup process through the FastDDNS app or interface.
This is especially useful when deploying multiple devices or when quick setup is required in real-world environments.
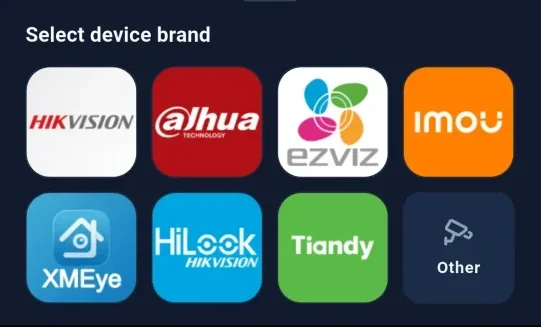
Supported Devices
This feature supports a wide range of popular camera and recorder brands:
- Dahua, Imou (Port 37777)
- Hikvision, EZVIZ, HiLook (Port 8000)
- Xiongmai, XMEye, Vantech (Port 34567)
- Tiandy (Port 3000 – 3001)
This allows you to use a single DDNS system across different types of devices.
Preparation Before Configuration
Missing these steps is a common cause of failure.
- Your device and phone/computer must be on the same local network (LAN)
- Know the local IP address of your camera or recorder, or use "Scan IP" or "Scan CCTV" to detect it
- Identify the correct access port
- Have the device username and password
- Create a hostname on FastDDNS
If the device is outside your local network, ensure proper port forwarding (NAT) is configured on your router.
Steps to Configure Automatic DDNS
Follow each step carefully to avoid errors.
Step 1: Open Hostname Settings
Log in to FastDDNS → select your hostname → go to the DDNS configuration section.
Step 2: Select Automatic Camera Setup
Choose the automatic camera configuration feature and select the correct device brand.
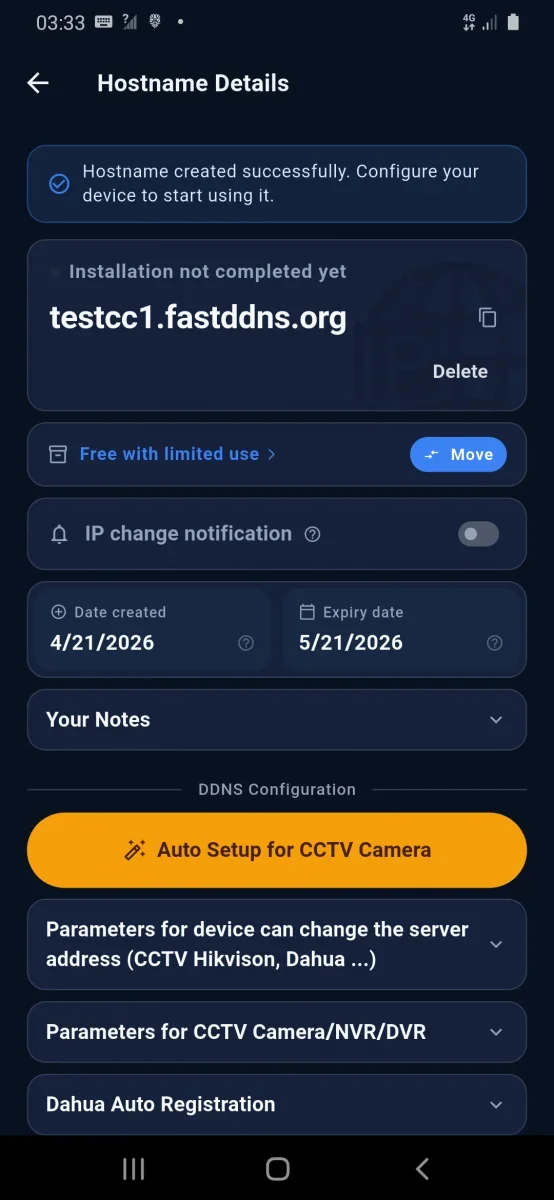
Step 3: Enter Device Information
- Local IP (LAN IP)
- Device port
- Username
- Password
You can use network scanning features to automatically detect devices.
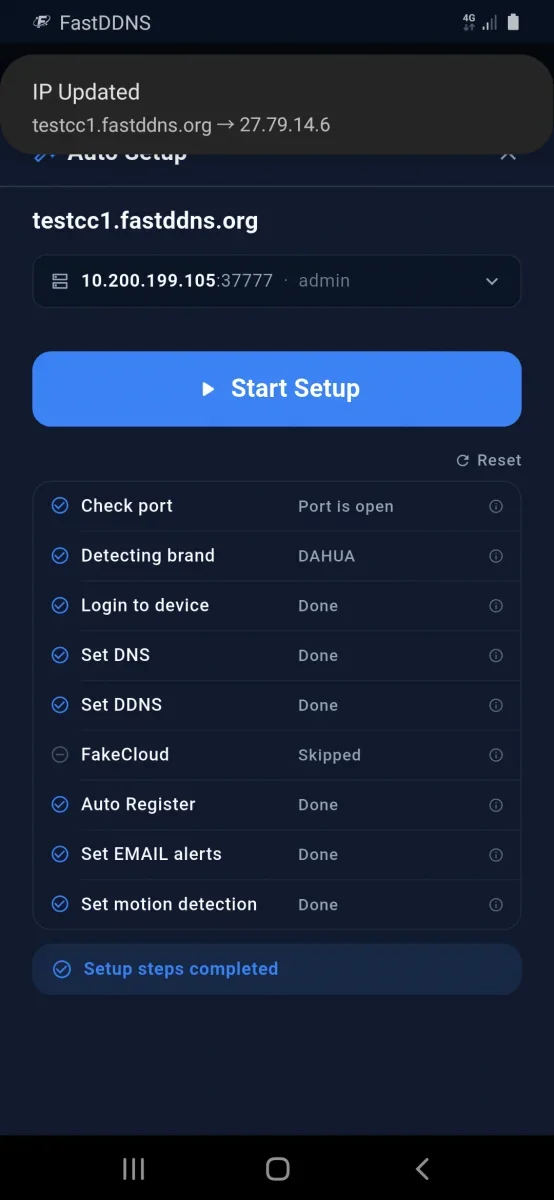
Step 4: Start Setup
The system will automatically perform the following steps:
- Check connection
- Log into the device
- Configure DNS
- Set up DDNS
- Sync IP address
Once all statuses are completed, the configuration has been applied.
Verify the Result
Confirm everything works correctly.
After setup, you can:
- Access the hostname via a browser
- Use your camera mobile app
- Check IP resolution using ping
ping your-domain.fastddns.net
If the returned IP matches your current public IP, DDNS is working correctly.
Common Issues
Cannot connect to the device
- Incorrect IP or port
- Wrong login credentials
Hostname works but cannot access remotely
- Port forwarding not configured
- ISP blocking ports
Hostname not updating IP
- Device offline
- Incorrect DNS configuration
Important Notes
This determines whether DDNS works or not.
- DDNS does not replace port forwarding
- A public IP is required for external access
- Networks using CGNAT will not work with DDNS
Note: Configuration results may vary depending on network conditions, device status, and router setup. If issues occur, troubleshoot step by step instead of restarting the entire process.
Conclusion
Understand it properly to use it effectively.
The automatic DDNS configuration feature on FastDDNS significantly reduces setup effort for cameras and recorders.
However, for stable operation, you still need to ensure proper network setup, port configuration, and device access permissions.
When configured correctly, you can access your cameras remotely in a stable way without worrying about changing IP addresses.